Introduction to Arduino Blink LED
Do you know C-language? What is your first program in C-language?
"Hello World"? Ya!!!
This BLINK LED project is similar to HELLO WORLD Project in C-language.
This is the first project on Arduino Board not only to learn yourself about Arduino, but to test a new Arduino board also. The BLINK LED project is explained in simple steps, to create interest in starting Arduino projects without having much knowledge about micro-controllers and Arduino.
To start with Arduino Blink LED project, the following items should be ready with you.
(Arduino uno is good for start with)
1) Arduino Uno board with matching USB cable. (USB A to B, also called USB printer cable).

2) Download and Install Arduino IDE software on your system (your PC / laptop)

Start Arduino BLINK LED :
The Blink LED project is explained in pictorial form for easy understanding. Just follow them.
1) Connect the Arduino USB cable (type A) in USB port of PC (Personal Comupter) or Laptop.
2) Connect the Arduino USB cable (type B) in USB port of Arduino Uno Board.
Then, a power ON indicator will glow on the Arduino Uno board (1 and 2 are interchangeable)


3) Click "ARDUINO" shortcut on your desktop (or where you have saved it).
Then, the Arduino IDE, will be displayed on your system.


4) Goto menu: "FILE" , Click "EXAMPLES", Select "01.BASICS", then Select "BLINK".
(i.e. menu-> File -> Examples -> 01.Basics -> Blink)
Then, a new window appears with BLINK LED code with comments before the actual code. Scroll UP to view actual code.


5) Goto menu: "Tools" , Click "BOARD", then Select "ARDUINO/GENUINO UNO".
(i.e. menu-> Tools -> Board -> Arduino/Genuino Uno )
[normally, it is set as default]

6) Goto menu: "Tools" , Click "PORT", then Select "COMX:ARDUINO/GENUINO UNO".
(i.e. menu-> Tools -> Port -> PortX:Arduino/Genuino Uno )
where X is a number. Normally, the port recognizes the arduino board by default and visible in the list for selection.

7) Goto menu: "Tools" , Click "PROGRAMMER", then Select "AVRMSP MKII".
( i.e. menu-> Tools -> Programmer -> AVRMSP mkII )
Normally, AVRMSP mkII is set as the the default programmer. If not, change it as AVRMSP mkII.

8) Goto menu: "Tools" , Click "GET BOARD INFO".
( i.e. menu-> Tools -> Get Board Info )
This operation is for confirming the connection to your Arduino Uno board. You may skip this step, if the board is automatically recognized by the port number. A message box will display the details of the Ardunio board immediately. In case of improper connection, it takes much time and displays an error message in the output screen (black screen at bottom)


9) Goto menu: "SKETCH" , Click "VERIFY/COMPILE".
( i.e. menu-> Sketch -> Verify/Compile ) or click tool bar icon
A text message "Compiling sketch..." and a progress bar appears in between text editor area and output area (black screen). On completion of compiling, the progress bar disappears and "Done compiling" message appears.


10) Goto menu: "SKETCH" , Click "UPLOAD".
( i.e. menu-> Sketch -> Upoload ) or click tool bar icon
Again text message "Compiling sketch...", then "Uploading..." along with a progress bar appears in between text editor area and output area. Two LEDs (TXD & RXD)on Arduino Uno board quickly blinks for a while and stops when uploading is completed. On completion of uploading, the progress bar disappears and "Done Uploading" message appears.
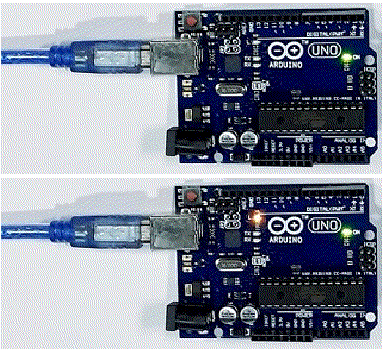
Now, THE INBUILT LED on the Arduino Uno board STARTS BLINKING at 1 second ON time and 1 second OFF time.
In case of any error, the error message is displayed at the output screen (black screen at bottom). The error message appears, mostly due to port connection problem or wrong Programmer selection. In that case, set the Board, Port and Programmer as explained above ( point 5, 6 & 7 ) and test the connection as explained above ( point 8 ). Then, retry for compiling and uploading the sketch.


Understanding Arduino BLINK LED :
11) Goto void setup ( ) in editor area.
The setup function runs once, when the Arduino Board is powered On (or pressed reset button). So, the setup function is used for initializing the input and output devices connected to the Arduino board.
In the Blink sketch, only one statement (using pinMode) is available in setup function,
pinMode(LED_BUILTIN, OUTPUT);
which sets the LED available (soldered) on Arduino Uno board at pin number 13, as output. The LED_BUILTIN keyword is pre-defined as 13 for Arduino Uno and automatically varies as per the selection of Board (refer above point 5)
12) Goto void loop ( ) in editor area.
The loop function runs infinite times, after the above setup function is called (or run) So, the loop function is used for reading input signal(s) from Arduino pins, process the input value(s), then send output signal(s) accordingly to Arduino pins. This is a continuous process, so is called loop function.
In the Blink sketch, only four statements are available, which uses in-built functions digitalWrite and delay, in loop function. The statements also have comments/remarks as suffix for each statement as explanation.
digitalWrite(LED_BUILTIN, HIGH);
delay(1000);
digitalWrite(LED_BUILTIN, LOW);
delay(1000);
The digitalWrite function is used to set any Arduino pin to logical value. i.e., digital high (+5V) or digital low (0V). The LED connected to the particular arduino pin glows when the pin is set as logical HIGH and goes off when the pin is set as logical LOW. So, the digitalWrite function is used to control (on/off) the LED at pin number 13 (which is declared as OUTPUT for LED_BUILTIN in setup function)
The delay function is used to make the micro-controller (on Arduino board) idle for a specific time, in milli-seconds. So, delay(1000); statement makes the micro-controller to just count time delay, set as 1000 milli-seconds and then process the next statement.
So, in the loop function, the statement 1 makes the LED to glow, the statement 2 makes the micro-controller wait (idle) for 1000 milli-seconds ( say one second ), the statement 3 makes the LED to go off and the statement 4 makes the micro-controller wait (idle) for 1000 milli-seconds again. Once, all the statements (4 in this case) are executed in the loop function, then, the control goes to starting of loop function, which executes the statements 1, 2, 3 & 4 and so on, until the power to Arduino board is switched off.
Playing with Arduino BLINK LED :
13) Editing Blink Sketch:
You may edit the Blink sketch and play with it. Here, you should not change pinMode and digitalWrite statements, since you are using only one pin for control (LED at pin 13). You may interchange statement 1 and 3, which makes the LED to go OFF first and goes ON next. But, due to continuous loop of OFF and ON (or ON and OFF), you may hardly notice the difference.
The second option is varying the delay time for the built-in LED, i.e., ON and OFF.. If you change the delay value after digitalWrite(LED_BUILTIN, HIGH), the ON time of LED effects. Similarly If you change the delay value after digitalWrite(LED_BUILTIN, LOW), the OFF time of LED effects.
An example code is shown below using swapping (this is optional) of statements 1 and 3 and changing delay for ON and OFF time of LED.
digitalWrite(LED_BUILTIN, LOW);
delay(100);
digitalWrite(LED_BUILTIN, HIGH);
delay(300);
By changing the code (sketch), the LED glows for 250 milli-seconds and goes off for 100 milliseconds. The difference may be easily identified by the naked eye
14) Compile and Upload Again:
After editing/changing the sketch as per your requirement (various delay timings), again COMPILE and UPLOAD it to the Arduino Uno board as explained earlier (refer point 9 and 10).

Customizing Arduino BLINK LED :
15) Customizing Blink LED Sketch:
So, you are using the example code so far and editing the delay timings for changing the ON or OFF of the On-board-LED (identified as LED_BUILTIN). But, in actual practice, any pin may be used as output pin and blink a LED by connecting it externally. For convenience, the pin number may be identified by a variable name and the same name is used throughout the sketch.
The following sketch (code) blinks an LED connected to pin number 8 and identified by the name LED_PIN. Remarks/comments are written against each statement for easy understanding.
#define LED_PIN 8 // name the pin number 8 as LED_PIN
// the setup function runs once when you press reset or power the board
void setup() {
// initialize digital pin LED_PIN as an output.
pinMode(LED_PIN, OUTPUT);
}
// the loop function runs over and over again forever
void loop() {
digitalWrite(LED_PIN, HIGH); // turn the LED on (logic HIGH, means Vcc voltage level)
delay(1000); // wait for ONE second ON time; i.e., 1000 milli-seconds
digitalWrite(LED_PIN, LOW); // turn the LED off (logic LOW, means GND or 0 voltage level)
delay(1000); // wait for ONE second OFF time
}

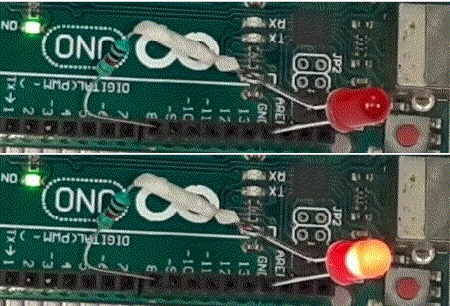
The output is shown here. So, You may define any pin as output and connect an LED with a series resistor ( in between 1k to 2.2K ) to limit the current flow through the pin.
If you want to WALK FAST, walk alone. But, if you want to WALK FAR, walk together
– Dr. Ratan Tata
